How to brew beer at home: a guide to home-brewing
Ah, pubs. How we miss you. You really can’t beat a cold one down at your local. But while the doors of Queen’s Heads across the country remain closed for the time being, who said you can’t learn how to brew beer at home?
While it may at first sound like an intimidating and expensive hobby, nothing could actually be further from the truth. Making beer at home is easy and fun. And once you’ve got the magic hop touch, a beer brewing kit will actually end up saving you money!
To help you on your way to crafting the perfect pint, we’ve consulted master brewers Woodforde’s, who are banging the drum for more cask ale lovers to brew their own beer at home. Working closely with their long-term partners Muntons, Woodforde’s have poured all their expertise into producing Wherry – the beer brewing kit that is taking the UK by storm.
This round’s on us.
Gather your beer brewing equipment
The first step towards your first homemade pint is to ensure you’ve got all the equipment you’ll need to hand. But before you jump on the internet with your shopping list and credit card at the ready, take a look around you – it’s very likely you’ll already have many of the things you’ll need lying about the house, including:
- Siphons
- Taps
- A sealable food grade bucket
- A hydrometer
- A vessel
- Malt extract
- Yeast
If gathering all that equipment sounds like too much admin, don’t fret – simply choose a bestselling beer making kit instead!
How to choose the perfect home brewing kit
For the best results, you need to do your research and secure a decent brewing setup. A good kit will include all of the equipment and ingredients you’ll need to get going, all in one box.
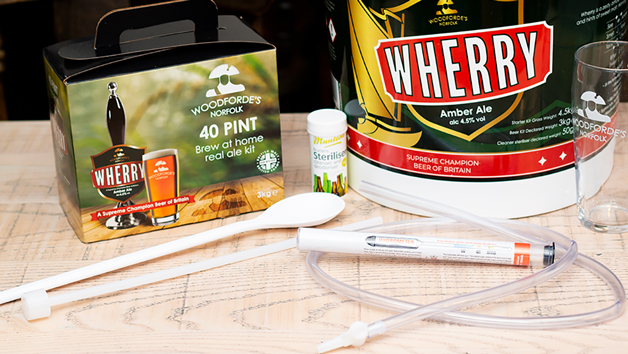
Look no further than Woodforde’s Wherry home brewing and starter kit – a brilliant, affordable, and easy-to-use option. Included in the kit, you’ll receive all the ingredients and equipment needed to brew beer at home, as well as four bottles of Wherry Amber Ale and a branded pint glass. All you need to do is get yourself bottles to transfer your brew to!
Woodforde’s recommend Wilko’s swing top bottles as a great option for a rustic look. Or, if you want your beer to look more authentic, you can buy bottles and caps separately, along with a crown capper to secure the caps tightly.

Become a master brewer and hone your craft as you produce up to 40 pints of the good stuff with this bestselling beer kit. Expect rich and golden tasting notes, as you serve up a few jars of Norfolk’s finest amber ale in the comfort of your own home!
How to sanitise your home brew equipment – and why it’s important
As you embark on your new brewing career, it’s vital to understand that cleanliness is key. In fact, unless your equipment is squeaky clean at the beginning of the process, you’ve already put your precious batch at risk!
Handily, Woodforde’s Wherry home brewing and starter kit comes with its own steriliser to clean equipment. But for future uses, and for when you haven’t got your kit’s steriliser to hand, Woodforde’s Head Brewer Neil Bain recommends not using chlorinated products to sterilise your equipment. Not only will chlorine make your brew taste like a swimming pool, but more importantly, chlorinated cleaning goods risk adding chlorophenolic taints (TCP) to your beer.
Instead, opt for washing-up liquid for cleaning, and bleach and proprietary mixes for sanitising. Make sure to wear gloves when you’re handling anything stronger than dish soap and be mindful of splashes – safety first, tasty beer second!
How to craft your beer
Once you’re set up and sparkling clean, it’s time to learn how to brew beer. Most recipes follow a pretty standard procedure but stick to these steps and you’ll be sipping on a delicious pint in no time.
- Heat your malt and hops
Your beer kit will provide you with some cans of malt and hops mix. Place the cans in hot water for 5 minutes, and once finished, pour the contents of the cans into the sealable food grade bucket.

- Add the water and steep
Dependent on how many pints you’re looking to make, add a mixture of boiling and cold water as directed on the kit, and mix thoroughly to ensure all the contents are fully dissolved.

- Add the yeast
Sprinkle the yeast on top of the beer mixture, stir everything together, and cover the fermenter bucket.

- Ferment
Leave the mixture to ferment for 4-6 days in a warm place (around 18-20°C). You’ll know that fermentation has occurred when the bubbles in the beer stop rising. If using a hydrometer, fermentation has been successful when the Original Gravity (OG) reading remains constant – this will usually be somewhere below 1014 SG.
- Bottle up
Transfer your fermented beer into bottles. Stand them in a warm place for two days, followed by a further 14 days in a cool place until the beer itself has cleared and is no longer clouded.
How to test the alcohol strength
By following the beer brewing kit instructions, your bottled beer should have an alcohol strength of about 4.5% Alcohol by Volume (ABV).
To test this, you will need to take two hydrometer readings – one at the start of the process before adding the yeast to ascertain the Original Gravity reading (OG), and another reading once the beer is ready to be bottled. This is known as the Present Gravity (PG).
With the help of some quick maths, you can calculate the beer strength by deducting the PG from the OG. Record the number and multiply this by 0.129 to calculate the alcohol strength. For example, 1044 (OG) – 1013 (PG) = 31 x 0.129 = 4.0% ABV.
Expert brewing tips from Woodforde’s Brewery
- Care for your ingredients
Treat your ingredients with respect, and they’ll treat you to some tasty beer at the end of the brewing process! Woodforde’s recommend keeping both the malt and the hops sealed in air-tight containers to avoid stale ingredients that will spoil your brew.
- Don’t shock your yeast
There’s a joke in here somewhere, but Woodforde’s are deadly serious when it comes to not subjecting the yeast to extreme temperatures – even if it’s dried. Seal your yeast in a temperature-controlled environment and stick to a gradual adjustment in conditions when moving from one to another.
- How to adjust your flavouring
The higher the temperature during the fermentation process, the fruitier the taste of the final beer. Woodforde’s recommend trying to control the temperature at around 24°C if you don’t want many fruity tasting notes.
Are you looking to achieve something a little more bitter? Don’t be scared to gently rouse your fermentation to make all the yeast consume all the sugar and achieve full attenuation.
- Be patient
All good things come to those who wait. Although it’s tempting, don’t bottle your beer too early. A partially fermented brew can result in an overly lively beer in the bottle! You’ve been warned.
The Woodforde’s brewers also advise handling your beer carefully as a bubble can only be formed once. If you’re too heavy-handed when bottling and create too much foam, your head retention will suffer when you come to drink it.
Best gifts for beer lovers
Whether you’re after a Home Beer Brewing Kit, or a Create the Pub at Home Kit, we’re sure to have a gift that will make any beer lover very hoppy. Explore our full range of beer gifts or sign up to our newsletter for all our top gift-buying tips and inspiration!


One Comment
margaret kanakos
I never brewed my own beer, but after reading your blog – I just might give it a try. Thanks for sharing this information.